Child's Tool Kit
An ideal addition to the Practical Life experiences available to your child or classroom community!
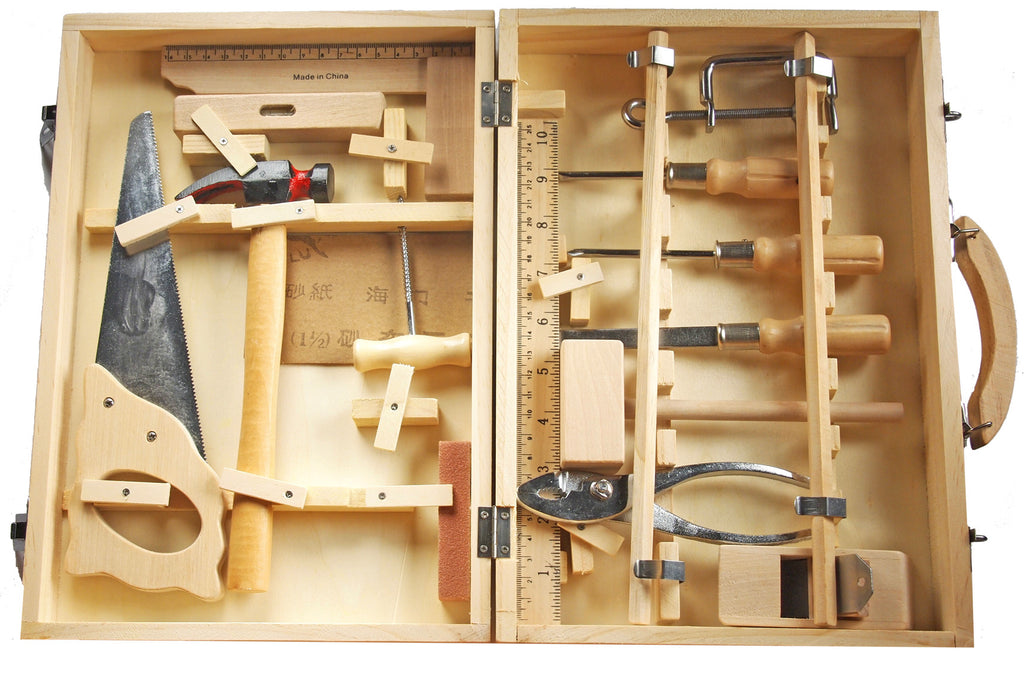
The Child's Tool Kit includes the following 16 real and functional tools:
- Hammer
- Saw
- Right-angle ruler
- Corkscrew
- Sandpaper squares
- Sanding block
- Spirit
- 25cm straight Ruler
- Wooden mallet
- Chisel
- Phillips Head Screwdriver
- Flat Head Screwdriver
- Clamp
- Pliers
- Small block lathe
- 2 x wooden dowels (flat on one side so they don't roll away!)
As a guide for the sizes - the screwdrivers, mallet, chisel and pliers are approximately 16cm in length. The saw is around 24cm in length and the hammer is 21cm.
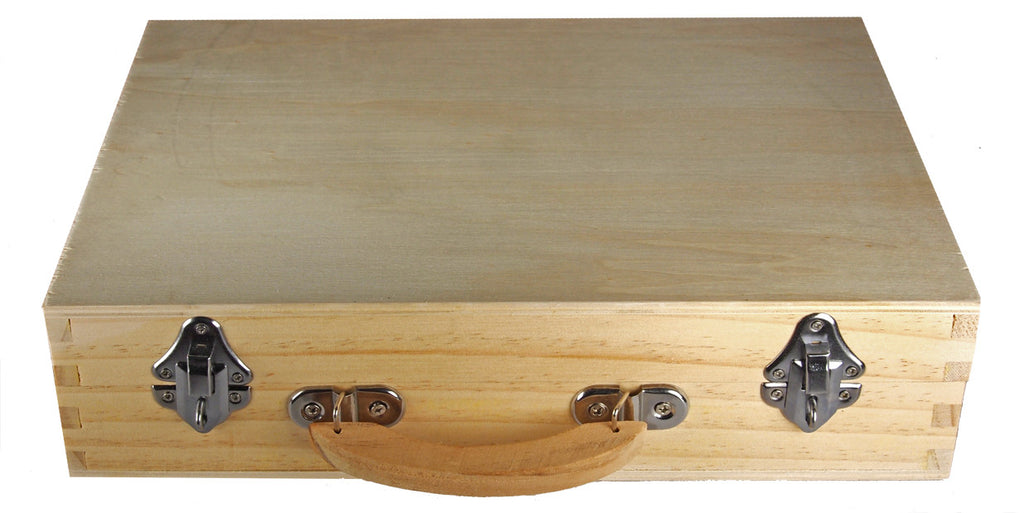
The tools are comfortably contained within a wooden carry case. It can be closed securely with the two metal latches and has a wooden handle so it can be easily carried from one work site to another! The wooden carry case measures 32cm x 22cm. Within this carry case you will find 'a place for everything and everything in its place'. Each tool has its own 'home' and is held there by little wooden latches (which easily swivel to release the tool) or by the dowels. This helps to prevent the tools from becoming misplaced - as the child can easily spot a 'gap' in the box if he/she hasn't replaced a tool. The secure placement of the tools under the latches/dowels also helps to increase the longevity of each tool as they are not rolling around or banging together in the box.
Manufacturer's Age Recommendation: 8 Years +


The use of real tools provides a child with a range of benefits, including (but not limited to);
- An increase in fine and gross motor coordination
- An increase in the child's sense of self-confidence ("I'm using real tools, just like an adult!")
- A proficiency with tools that will remain equally relevant and useful throughout the child's lifetime
- An encouragement of problem-solving, creativity and persistence
- A productive, positive outlet for energy
- A promotion of maths skills such as measurement and comparison
- A connection to the sensory beauty of wood
- An encouragement of meaningful creativity and imagination followed by physical actualisation of the intellectual thought
- A promotion of gender and age equity ("It doesn't matter if I'm a boy or a girl, or if I'm young or old, I can do it myself!")
Safety advice: These are real, functional tools, not toys. This offers opportunities but also presents risk. The set includes sharp tools, heavy pieces and other potentially risky characteristics. When making a purchase please first consider whether you are comfortable with these features. The manufacturer's age recommendation is 8+. We ask you to be conscientious about presenting real tools to children of any age. We take no responsibility for any injury or accidents resulting from the use of the Tool Kit. The Montessori philosophy embraces the presence of some 'risk' in a child's life as a way to learn about risk-assessments and encourage responsible handling of materials but each parent, teacher or carer must make their own decisions in determining the safety of the child(ren) in their care. To read more about the Montessori approach to 'risk' please read our Safety Suggestion page.
It is important to note that this particular tool set does not, in any way, imply that it is more or less suitable for one gender or the other. The tools themselves are wood and metal, the box itself is plain wood. There are no 'characters' printed on the box, no colours on the handles of the tools, so there are no subliminal messages being communicated that the tools are meant 'for boys' (or 'for girls'). They are tools for little people and are equally appropriate for both genders.
For a child who is brand new to the use of tools I would suggest that it would be ideal to simply begin by presenting the tools one by one. The adult can present a tool, introduce its correct terminology (including its name but also the verbs that articulate its function) and model its proper use. I would recommend starting the individual presentation process with the tools that pose the least 'risk' first - such as the sandpaper or sanding block - before progressing to the sharper, more 'risky' tools. This progression allows the child to develop the motor skills and the respect for the tools that is necessary to successfully and safely handle the more 'risky' pieces.
The individual tools could be set up in activity trays to allow the child to engage in exercise and repetition. For instance, the flat-head screwdriver could be presented as an isolated exercise on a tray with just a block of soft wood (with some holes made by the adult) and a small basket of screws. The child can then, following the presentation from the adult, engage in repetition of the process of screwing and unscrewing to become proficient in handling the tool itself. A child who is engaging in more complex woodworking projects, but is showing signs of struggle with a specific tool, could also be supported by returning to this stage. The adult could observe the child's work to identify where he/she is finding a tool challenging and could then arrange that individual tool in an isolated exercise tray in order to allow the child to focus specifically on refining that skill.
When you provide presentations remember to draw the child's attention to subtle but important 'points of interest' such as ensuring that when the saw is being used the 'non-dominant' hand is used to stabilise the surface without getting close to the blade.
For a child who has already had some early experiences with tools (or after you have provided the individual presentations) the child can engage in open-ended exploration. There are endless options for woodworking projects that a child could try. These could be supported by an adult or could simply be based on the unique creativity of the child! Simply provide the child with pieces of wood (initially softer woods are best) and an appropriate work space. Check Pinterest or Google if you are looking for ideas for specific projects.
The use of the Tool Kit also provides the child with the opportunity for another Practical Life lesson - caring for the tools. It is important to encourage the child to develop positive habits from an early stage so please emphasise the importance of cleaning and checking the tools before replacing them to the box. This can increase the longevity and functionality of the tools.
"Seven Developmental Stages of Children's Woodworking
"Stage One - Acquaintance with tools and wood. This stage is an initial exploration of tools and wood. Through manipulation of these, the child learns about weight, balance strength, and texture.
Stage Two - Simple skill attempts. During this stage, children actively explore hammering, sawing, and gluing. Projects will be attempted, but few objects will be built.
Stage Three - Simple construction. With building confidence, children work at planning, sequencing, and creating a new object. They may select a piece of wood, for example, saw it in tow pieces, and then join them with nails to create a new shape.
Stage Four - Refinement. As children continue to improve their workmanship by creating several projects, they will begin to add finishing touches such as sanding rough edges and gluing before nailing.
Stage Five - Functional construction. The finished products at this stage may have a more realistic look because the children intentionally put pieces together to form a shape with a name and added reality.
Stage Six - Decorative combinations. Children at this stage use carpentry with the intention of creating something for use elsewhere. They plan, collect materials, and execute the plan to complete a project. The addition of previous planning makes this stage different from stage five.
Stage Seven - Emergence of craft. Children continue to try new ideas and refine existing techniques. Carpentry is used as both a functional and symbolic skill."
Safety precautions:
It is extremely important to note that these are real, functional tools. They are not 'toy' tools for 'pretend play' - they are smaller versions of woodworking tools and, as such, they can be sharp, hard or both!
At Montessori Child we know you are conscientious about your child’s early experiences – that is why you came to find us in the first place – but we are also sure you are eager to deepen your understanding of how to balance your child’s right to be active with your instinct to protect. We advise that the caring adult should engage in...
-Testing
Handle and use the material yourself first to help you notice potential hazards and so that you understand how to safely supervise and assist your child.
-Demonstration
Demonstrate the activity to your child, highlighting specific aspects or strategies that might minimise risk and increase the chances of safety and success.
-Supervision
Supervise your child, especially with a new material, to provide safety and promote bonding.
-Customisation
Find creative ways to adapt, simplify or extend a material to suit your child’s unique needs and abilities.
-Equipment provision
Provide safety equipment, and an appropriate environment, to ensure that risks are minimised.
More information about these safety precautions are available on our Safety Suggestions page. We highly recommend that you read this information before presenting the tools to your child.
Please note: The Child's Tool Kit does not include screws, nails, bolts, wood etc. These will need to be sourced separately.